Android Things - Discovering & chaining I²C devices
In a previous post, we created our own I²C device.
This was actually a necessary first step before we could try a cool feature of I²C, which is supporting multiple slave devices connected along the same bus.
Now that we’ve got some I²C devices, let’s start.
Our I²C devices
We will use 3 different devices:
- SSD1306 OLED display (driver)
- LCD 1602 with PCF8574 I²C adapter (driver)
- Arduino I²C fan (implementation)

The Android Things master device will start the fan at a lower speed, set the speed to medium, then high, and finally stop the fan.
Each time the speed changes, the LCD and OLED screens will show the new state, either by displaying a Bitmap (for the SSD1306), or some text (for the LCD1602).
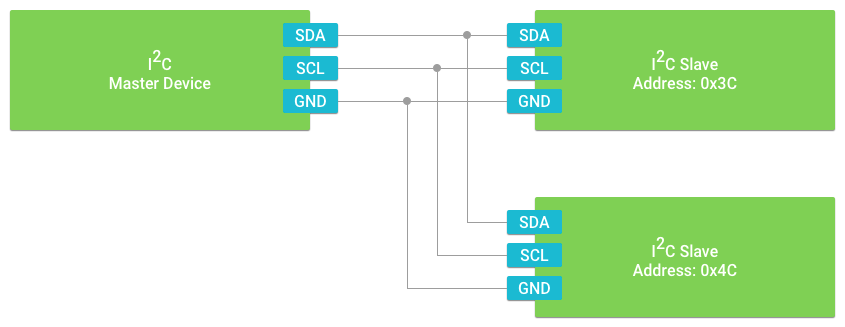
Connecting the devices
You can connect multiple I²C devices on the bus in parallel.
Here’s how, from the official I2C documentation:
Determining I²C address without datasheet
With I²C, every slave device must have an address, even if the bus contains only a single slave.
Thus, when you open an I2CDevice using the Things Support Library, you have to specify the I²C bus and the device address:
val manager = PeripheralManager.getInstance()
val device = manager.openI2cDevice(I2C_BUS_NAME, I2C_ADDRESS)
As you have guessed, addresses are useful when multiple devices are connected to the same bus.
Each device has its own I²C address, and it is usually mentioned in the device datasheet.
If you don’t know a device’s address, you can either:
- Use an Arduino to scan the bus using the Arduino i2c scanner sketch
- Add the following extension function to your Android Things project:
fun PeripheralManager.scanI2cAvailableAddresses(i2cName: String): List<Int> {
    return (0..127).filter { address ->
        with(openI2cDevice(i2cName, address)) {
            try {
                write(ByteArray(1), 1)
                true
            } catch (e: IOException) {
                false
            } finally {
                close()
            }
        }
    }
}
This function will loop for each address and try to write a “0” byte. If it succeeds, then it means a device is connected. The function will return a list of detected device addresses.
Here’s how to call it and write device addresses to the logs:
Log.i(TAG, "Scanning I2C devices")
manager.scanI2cAvailableAddresses(I2C_BUS_NAME)
    .map { String.format(Locale.US, "0x%02X", it) }
    .forEach { address -> Log.i(TAG, "Found: $address") }
}
In your Android logs, you’ll get the following:
Scanning I2C devices
Found: 0x3C
Found: 0x3F
Found: 0x42
3 addresses were found: 0x3C (OLED screen), 0x3F (LCD screen), and 0x42 (Arduino fan).
Displaying the current fan speed
We’ve got everything we need to use our I²C peripherals now.
First, we define an enum for the fan speed
enum class Speed {
  LOW, MEDIUM, HIGH
}
And then, we can start initializing our I²C peripherals:
override fun onCreate(savedInstanceState: Bundle?) {
    super.onCreate(savedInstanceState)
    lcd = LcdPcf8574(I2C_PIN_NAME, I2C_ADDRESS_LCD).apply {
        begin(16, 2)
        setBacklight(true)
    }
    oled = Ssd1306(I2C_PIN_NAME, I2C_ADDRESS_OLED)
    fan = ArduinoFanI2C(I2C_PIN_NAME, I2C_ADDRESS_ARDUINO)
}
Now, we can write some functions to show the speed, for each display:
fun LcdPcf8574.showSpeed(speed: Speed) {
    clear()
    print("Speed is ${speed.name}")
}
and
fun Ssd1306.showSpeed(speed: Speed, resources: Resources) {
    val resId = when (speed) {
        LOW -> R.drawable.ssd1306_low
        MEDIUM -> R.drawable.ssd1306_medium
        HIGH -> R.drawable.ssd1306_high
    }

    clearPixels()
    val bmp = BitmapFactory.decodeResource(resources, resId)
    BitmapHelper.setBmpData(this, 0, 0, bmp, false)
    show()
}
We’ll need the following assets:

Finally, we can add the following code to start the fan, iterate through each speed and stop the fan
fan.start()

Speed.values().forEach { speed ->
    fan.speed = speed
    lcd.showSpeed(speed)
    oled.showSpeed(speed, resources)
    wait1sec()
}

fan.stop()
lcd.clear()
oled.clearPixels()
Video
Conclusion
Communicating with multiple I²C slaves is really easy.
You actually have nothing special to do, except connecting them on the bus in parallel.
You can find the complete source code on GitHub:
https://github.com/Nilhcem/i2cfun-androidthings/