Android Things - Communicating with Bluetooth Low Energy devices
Android Things supports both Bluetooth and Bluetooth Low Energy APIs.
In this blog post, we will use the Bluetooth LE API to communicate between a server (an Android Things board) and a client (an Android app on a phone / watch).
We will build a counter device for our awesomeness: every time you feel awesome (for any reason whatsoever), press a button on your mobile device. A lucky cat will move its paw and increment your awesomeness counter.
Understanding Bluetooth Low Energy (BLE)
BLE is based on a specification called “General ATTribute profile” (GATT), which defines how to transfer and receive short pieces of data known as “attributes” between a server and a client.
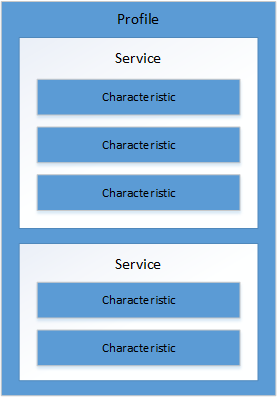
It mentions concepts, such as “profiles”, “services”, “characteristics” and “descriptors”.
A profile is a collection of (1 or multiple) services.
Each service (which can be thought of a behavior) can contain one or multiple characteristics that encapsulate data.
To ensure interoperability, the Bluetooth SIG (Special Interest Group) has predefined several profiles and services.
Imagine that we want to create our own keyboard device. To ensure compatibility, we will have to follow the HID (Human Interface Device) over GATT profile:
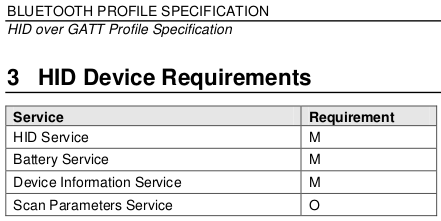
A profile is mostly a specification telling us which services we will have to implement.
To create our custom keyboard, we will have to implement 3 mandatory services (HID, Battery, Device Info), and optionally a Scan Parameters service.
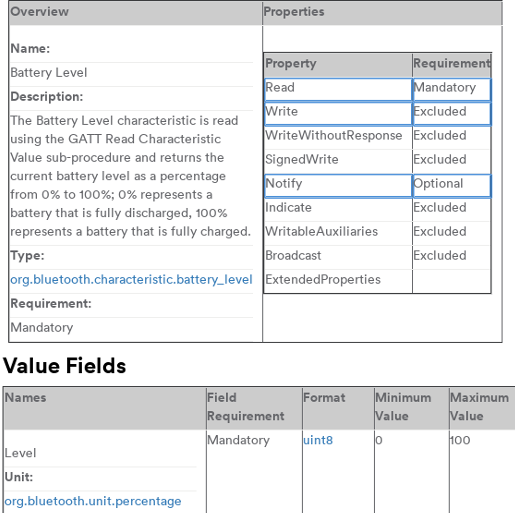
If we take a look at the Battery Service, which exposes the state of a battery within a device, we can see that it embeds a single and mandatory read-only characteristic named Battery Level.
This characteristic encapsulates an int value between 0 and 100, which represents the device battery percentage. It also has an optional “Notify” property, which means that a client can subscribe to it, to be automatically notified when the value has changed.
Getting started with BLE on Android
The official documentation is the best way to get started with Bluetooth Low Energy on Android.
Google also provides 2 sample projects:
- android-BluetoothLeGatt: an Android client that scans devices exposing services and lists their characteristics.
- sample-bluetooth-le-gattserver: an Android Things server that implements the Current Time service.
After deploying those two projects, you’ll be able to scan the Android Things GATT server:
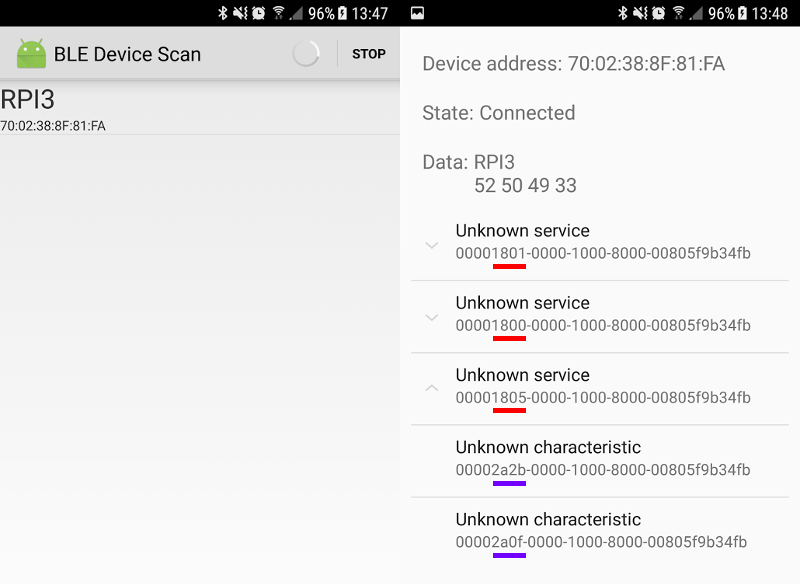
Services and characteristics are uniquely identified by a UUID.
Here, the RPI3 exposes 3 services: Generic Attribute (0x1801), Generic Access (0x1800), and Current Time service (0x1805). This latter has two characteristics: Current Time (0x2A2B) and Local Time Information (0x2A0F)
A word on custom GATT services / characteristics
While implementing services as defined by the Bluetooth SIG is the recommended way, it is also possible to create your own proprietary services (and we will do that today). This can be a preferred solution in some cases, but you will not have the benefit of interoperability.
You should use 128-bit random UUIDs for your non-standard services and characteristics. Short 16-bit UUIDs are only for services / characteristics defined by the Bluetooth standard.
Creating the server
Now that we are familiar with BLE key concepts, we can start implementing our GATT server.
Our Android Things project will expose a single service with two characteristics:
AwesomenessCounter: A read-only, notifyable, property that indicates the number of times you have been awesome so farAwesomenessInteractor: When a client writes a value to this characteristic, the device should move the cat’s paw and increment the awesomeness counter.
The following code will be heavily inspired from the sample-bluetooth-le-gattserver. If you need to create a GATT server, you can use this project as a reference, or follow the official documentation.
Constants
We will define the following constants:
SERVICE_UUID = UUID.fromString("795090c7-420d-4048-a24e-18e60180e23c");
CHARACTERISTIC_COUNTER_UUID = UUID.fromString("31517c58-66bf-470c-b662-e352a6c80cba");
CHARACTERISTIC_INTERACTOR_UUID = UUID.fromString("0b89d2d4-0ea6-4141-86bb-0c5fb91ab14a");

DESCRIPTOR_CONFIG_UUID = UUID.fromString("00002902-0000-1000-8000-00805f9b34fb");
As explained earlier, services and characteristics are uniquely identified by a UUID.
Since we are not implementing a standard service, we use randomly generated values.
Also, notice the DESCRIPTOR_CONFIG_UUID constant:
Each characteristic holds a value.
If we take the example of the “Battery Level” characteristic, it holds a value from 0 to 100.
A characteristic can also hold some descriptors. Descriptors define metadata such as description and presentation information.
Some examples of GATT Descriptors:
Characteristic User Description(0x2901): Provides a textual user description for a characteristic value.Valid Range(0x2906): Defines the range of a characteristic.Client Characteristic Configuration(0x2902): Defines how the characteristic may be configured by a specific client.
If a client wants to subscribe to a characteristic, so it can be automatically notified when a value changes, it should perform a write operation on the “Client Characteristic Configuration” descriptor to notify its intent.
Here, we define a DESCRIPTOR_CONFIG_UUID so that clients can subscribe to the CHARACTERISTIC_COUNTER_UUID value if they want.
AndroidManifest.xml
First, we declare the BLUETOOTH and BLUETOOTH_ADMIN permissions. BLUETOOTH_ADMIN is required to initiate discovery, or automatically enable Bluetooth on the device.
<uses-permission android:name="android.permission.BLUETOOTH" />
<uses-permission android:name="android.permission.BLUETOOTH_ADMIN" />
<uses-feature android:name="android.hardware.bluetooth_le" />
We also specify that our app requires the bluetooth_le feature to work. If Bluetooth LE is an optional feature of your app, set the feature to android:required="false".
Start advertising
When the Android Things program starts, it should start advertising, so that other devices can see which BLE services it exposes, and can connect to it.
// The BluetoothAdapter is required for any and all Bluetooth activity.
mBluetoothManager = (BluetoothManager) getSystemService(BLUETOOTH_SERVICE);
BluetoothAdapter bluetoothAdapter = mBluetoothManager.getAdapter();

// Some advertising settings. We don't set an advertising timeout
// since our device is always connected to AC power.
AdvertiseSettings settings = new AdvertiseSettings.Builder()
        .setAdvertiseMode(AdvertiseSettings.ADVERTISE_MODE_BALANCED)
        .setConnectable(true)
        .setTimeout(0)
        .setTxPowerLevel(AdvertiseSettings.ADVERTISE_TX_POWER_MEDIUM)
        .build();

// Defines which service to advertise.
AdvertiseData data = new AdvertiseData.Builder()
        .setIncludeDeviceName(true)
        .setIncludeTxPowerLevel(false)
        .addServiceUuid(new ParcelUuid(SERVICE_ID))
        .build();

// Starts advertising.
mBluetoothLeAdvertiser = bluetoothAdapter.getBluetoothLeAdvertiser();
mBluetoothLeAdvertiser.startAdvertising(settings, data, mAdvertiseCallback);
Advertising is battery-intensive. Here, our device is always connected to AC power so it will advertise continuously.
If it runs on battery, a good idea would be to add a timeout, and a physical button to start the advertising process. Also, you will need to stop the advertising once a client is connected.
The startAdvertising method needs an AdvertiseCallback instance, defined below:
private AdvertiseCallback mAdvertiseCallback = new AdvertiseCallback() {
    @Override
    public void onStartSuccess(AdvertiseSettings settingsInEffect) {
        Log.i(TAG, "LE Advertise Started.");
    }

    @Override
    public void onStartFailure(int errorCode) {
        Log.w(TAG, "LE Advertise Failed: " + errorCode);
    }
};
Creating the GATT service
We have to programmatically define our GATT service.
Remember, our service should contain 2 characteristics:
- A counter (read-only, supports subscriptions via a config descriptor)
- An interactor (write-only)
private BluetoothGattService createService() {
  BluetoothGattService service = new BluetoothGattService(SERVICE_UUID, SERVICE_TYPE_PRIMARY);

  // Counter characteristic (read-only, supports subscriptions)
  BluetoothGattCharacteristic counter = new BluetoothGattCharacteristic(CHARACTERISTIC_COUNTER_UUID, PROPERTY_READ | PROPERTY_NOTIFY, PERMISSION_READ);
  BluetoothGattDescriptor counterConfig = new BluetoothGattDescriptor(DESCRIPTOR_CONFIG_UUID, PERMISSION_READ | PERMISSION_WRITE);
  counter.addDescriptor(counterConfig);

  // Interactor characteristic
  BluetoothGattCharacteristic interactor = new BluetoothGattCharacteristic(CHARACTERISTIC_INTERACTOR_UUID, PROPERTY_WRITE_NO_RESPONSE, PERMISSION_WRITE);

  service.addCharacteristic(counter);
  service.addCharacteristic(interactor);
  return service;
}
Starting the server
Then, we start the Bluetooth LE server with the openGattServer method.
mGattServer = mBluetoothManager.openGattServer(mContext, mGattServerCallback);
mGattServer.addService(createService());
This method takes a BluetoothGattServerCallback instance, which contains callbacks to implement when a characteristic / descriptor is read or written.
Returning the counter value
When a GATT client reads on the CHARACTERISTIC_COUNTER_UUID, we should return the value of the counter.
For that, we override the onCharacteristicReadRequest method of our BluetoothGattServerCallback, and return the currentCounterValue if there is a read request on the counter characteristic:
@Override
public void onCharacteristicReadRequest(BluetoothDevice device,
    int requestId, int offset, BluetoothGattCharacteristic characteristic) {
  if (CHARACTERISTIC_COUNTER_UUID.equals(characteristic.getUuid())) {
    byte[] value = Ints.toByteArray(currentCounterValue);
    mGattServer.sendResponse(device, requestId, GATT_SUCCESS, 0, value);
  }
}
Incrementing the counter
When a GATT client writes on the CHARACTERISTIC_INTERACTOR_UUID, we should increment the value of the counter.
For that, we can override the onCharacteristicWriteRequest method:
@Override
public void onCharacteristicWriteRequest(BluetoothDevice device,
    int requestId, BluetoothGattCharacteristic characteristic,
    boolean preparedWrite, boolean responseNeeded, int offset, byte[] value) {
  if (CHARACTERISTIC_INTERACTOR_UUID.equals(characteristic.getUuid())) {
    currentCounterValue++;
    notifyRegisteredDevices();
  }
}
Notice here the notifyRegisteredDevices() call.
Since the counter value has changed, we should notify devices. We will see the implementation later, but first, let’s handle the subscription.
Handling notifications
If a client wants to be notified of any changes in the counter characteristic value, it should write its intent on a config descriptor.
We override the onDescriptorWriteRequest and keep a reference of the Bluetooth device in a private list named mRegisteredDevices:
@Override
public void onDescriptorWriteRequest(BluetoothDevice device,
    int requestId, BluetoothGattDescriptor descriptor,
    boolean preparedWrite, boolean responseNeeded, int offset, byte[] value) {
  if (DESCRIPTOR_CONFIG_UUID.equals(descriptor.getUuid())) {
    if (Arrays.equals(ENABLE_NOTIFICATION_VALUE, value)) {
      mRegisteredDevices.add(device);
    } else if (Arrays.equals(DISABLE_NOTIFICATION_VALUE, value)) {
      mRegisteredDevices.remove(device);
    }

    if (responseNeeded) {
      mGattServer.sendResponse(device, requestId, GATT_SUCCESS, 0, null);
    }
  }
}
Now, we can create our notifyRegisteredDevices method that simply calls notifyCharacteristicChanged for each subscribed devices:
private void notifyRegisteredDevices() {
  BluetoothGattCharacteristic characteristic = mGattServer
    .getService(SERVICE_UUID)
    .getCharacteristic(CHARACTERISTIC_COUNTER_UUID);

  for (BluetoothDevice device : mRegisteredDevices) {
    byte[] value = Ints.toByteArray(currentCounterValue);
    counterCharacteristic.setValue(value);
    mGattServer.notifyCharacteristicChanged(device, characteristic, false);
  }
}
Testing the GATT server
We have finished writing our GATT server.
Before we start creating the client, we will first test the server to ensure that we have implemented all the features properly.
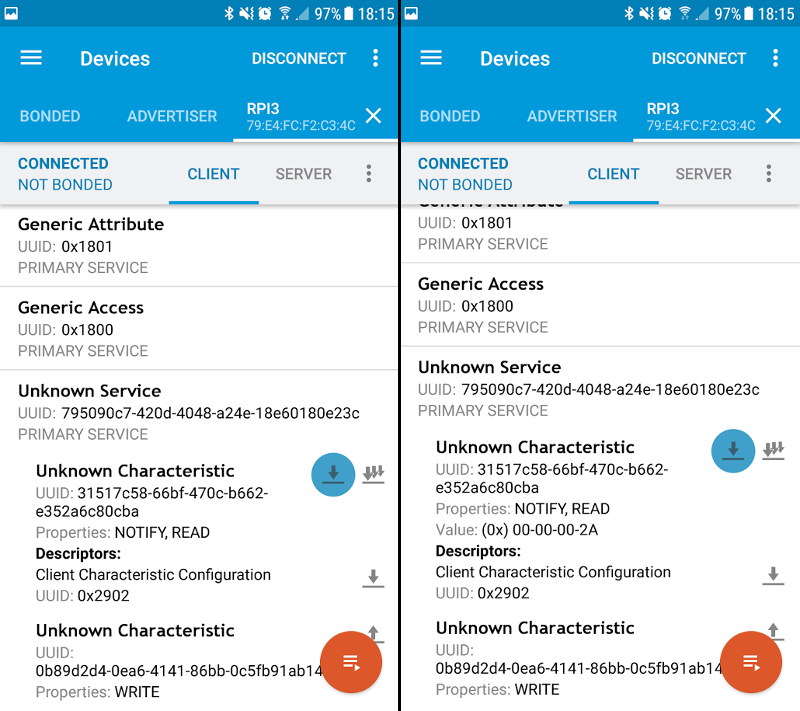
To test Bluetooth LE devices, you can use the nRF Connect for Mobile app.
This application allows you to scan Bluetooth low energy devices and lets you read, write, subscribe to characteristics.
After starting the app, we can see that the RPI3 is advertising. Once we connect to it, we can see our custom service (UUID=7950…)
Using this app, we can browse all the characteristics of a given service.
We can click on the read button (in blue) to read the value of the counter characteristic (here, value equals 0x2A [42]).
We can also be notified when the counter characteristic changes, write on the interactor characteristic, and see the value automatically incremented.
Creating the client
We have tested our Android Things app and it works well.
Now, we have to create a mobile client, which can connect to the advertising device, and read / write on characteristics.
Scanning BLE devices
When the Android client app starts, the first thing it should do is to scan available Bluetooth LE devices.
Scanning BLE devices can be quite complex, as the initial API (SDK 18) has changed in SDK 21, and was also extended in SDK 23 (source: What to keep in mind when developing your BLE Android app).
To simplify, we will use a unified third party compat library: Android BLE Scanner Compat library
BluetoothLeScannerCompat scanner = BluetoothLeScannerCompat.getScanner();

// We want to receive a list of found devices every second
ScanSettings settings = new ScanSettings.Builder()
  .setScanMode(ScanSettings.SCAN_MODE_LOW_LATENCY)
  .setReportDelay(1000)
  .build();

// We only want to scan for devices advertising our custom service
ScanFilter scanFilter = new ScanFilter.Builder()
  .setServiceUuid(new ParcelUuid(SERVICE_UUID)).build();
scanner.startScan(Arrays.asList(scanFilter), settings, mScanCallback);
Again, scanning is battery-intensive. We should create a handler that stops the scan after a few seconds (e.g. 10 seconds), and stop scanning as soon as we find the desired device.
The startScan method takes a ScanCallback implemented below:
private final ScanCallback mScanCallback = new ScanCallback() {
  @Override
  public void onScanResult(int callbackType, ScanResult result) {
    // We scan with report delay > 0. This will never be called.
  }

  @Override
  public void onBatchScanResults(List<ScanResult> results) {
    if (!results.isEmpty()) {
      ScanResult result = results.get(0);
      BluetoothDevice device = result.getDevice();
      String deviceAddress = device.getAddress();
      // Device detected, we can automatically connect to it and stop the scan
    }
  }

  @Override
  public void onScanFailed(int errorCode) {
    // Scan error
  }
};
onBatchScanResults will periodically return a list of detected devices, depending on the setReportDelay value you specified earlier.
You can add these devices to a list so that users can select which device they want to connect to.
In our case, we know there’s only one device advertising our custom service, so we will automatically connect to it once detected.
Connecting to the GATT server
To connect to a GATT server, use the device address to get an instance of a BluetoothDevice, and then call the connectGatt method:
BluetoothDevice device = mBluetoothAdapter.getRemoteDevice(deviceAddress);
mGatt = device.connectGatt(mContext, false, mGattCallback);
This method takes a BluetoothGattCallback, very similar to the BluetoothGattServerCallback we saw earlier, containing callback methods when a characteristic / descriptor has been read / write.
– WARNING – Callback Hell Incoming – WARNING –
Be prepared! You are going to see a succession of callbacks. Each operation has an associated callback. We can’t perform two Bluetooth operations, e.g. two write operations, at the same time. We will have to wait for one to finish before we can start the next one.
Discovering services
When the GATT connection succeeds, the onConnectionStateChange will be called.
You can start here discovering services when the device is connected successfully:
@Override
public void onConnectionStateChange(BluetoothGatt gatt, int status, int newState) {
  if (newState == BluetoothProfile.STATE_CONNECTED) {
    Log.i(TAG, "Connected to GATT client. Attempting to start service discovery");
    gatt.discoverServices();
  } else if (newState == BluetoothProfile.STATE_DISCONNECTED) {
    Log.i(TAG, "Disconnected from GATT client");
  }
}
Enabling notifications for the counter characteristic
The discoverServices method will then call an onServicesDiscovered method you’ll have to override.
Our client wants to be notified of each CHARACTERISTIC_COUNTER_UUID change, so it’s the right place to start writing to the descriptor:
@Override
public void onServicesDiscovered(BluetoothGatt gatt, int status) {
  if (status != BluetoothGatt.GATT_SUCCESS) {
    // Handle the error
    return;
  }

  // Get the counter characteristic
  BluetoothGattCharacteristic characteristic = gatt
    .getService(SERVICE_UUID)
    .getCharacteristic(CHARACTERISTIC_COUNTER_UUID);

  // Enable notifications for this characteristic locally
  gatt.setCharacteristicNotification(characteristic, true);

  // Write on the config descriptor to be notified when the value changes
  BluetoothGattDescriptor descriptor =
    characteristic.getDescriptor(DESCRIPTOR_CONFIG_UUID);
  descriptor.setValue(BluetoothGattDescriptor.ENABLE_NOTIFICATION_VALUE);
  gatt.writeDescriptor(descriptor);
}
Reading the counter value
Now, we want to read the counter value. We can’t do it in the onServicesDiscovered method, as there is already a pending write operation on a descriptor.
So, we will override onDescriptorWrite and start reading our characteristic here, after the descriptor has been written:
@Override
public void onDescriptorWrite(BluetoothGatt gatt,
    BluetoothGattDescriptor descriptor, int status) {
  if (DESCRIPTOR_CONFIG_UUID.equals(descriptor.getUuid())) {
    BluetoothGattCharacteristic characteristic = gatt
      .getService(SERVICE_UUID)
      .getCharacteristic(CHARACTERISTIC_COUNTER_UUID);
    gatt.readCharacteristic(characteristic);
  }
}
Updating the UI when the counter value has been fetched
When the characteristic is read, the onCharacteristicRead method will be called.
We can receive here the characteristic value, and update the UI:
@Override
public void onCharacteristicRead(BluetoothGatt gatt,
    BluetoothGattCharacteristic characteristic, int status) {
  readCounterCharacteristic(characteristic);
}

private void readCounterCharacteristic(BluetoothGattCharacteristic
    characteristic) {
  if (CHARACTERISTIC_COUNTER_UUID.equals(characteristic.getUuid())) {
    byte[] data = characteristic.getValue();
    int value = Ints.fromByteArray(data);
    // Update UI
  }
}
Being notified when the value changes
Finally, since we are now notified when the characteristic value automatically changes, we can override onCharacteristicChanged to once again read the counter value and update the UI
@Override
public void onCharacteristicChanged(BluetoothGatt gatt,
    BluetoothGattCharacteristic characteristic) {
  readCounterCharacteristic(characteristic);
}
And… we are done!
Well, not completely… We are done with the BLE part, but there’s still no physical counter, nor lucky cat.
Adding some fun (a.k.a creating the physical object)
At that moment, if I tell you that we wrote all this stuff only to have a variable that increments automatically when a client sends a write request, you’ll probably say something like “All that for nothing!?!”.
Thanks to Android Things, we will add some fun, and create a physical object around this software.
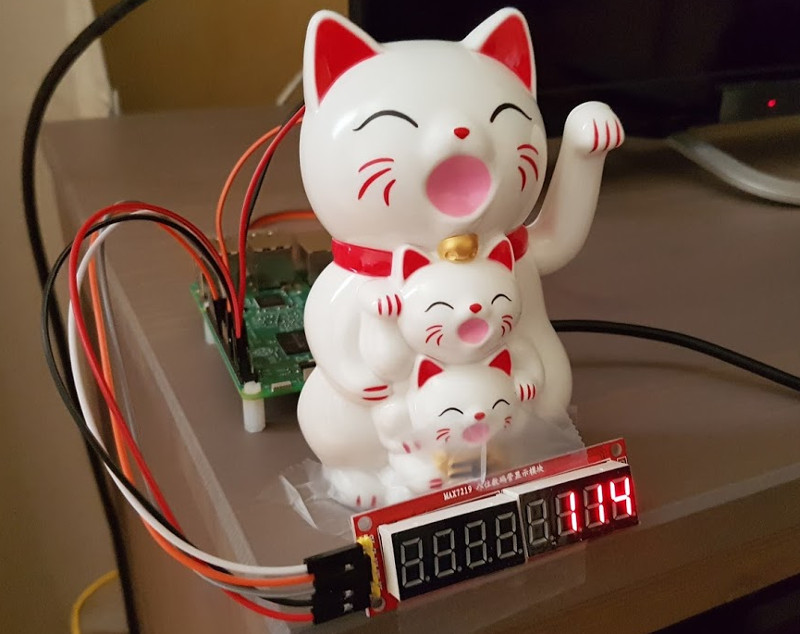
A physical counter device
The display used here will be a “MAX7219 8-digit module”.
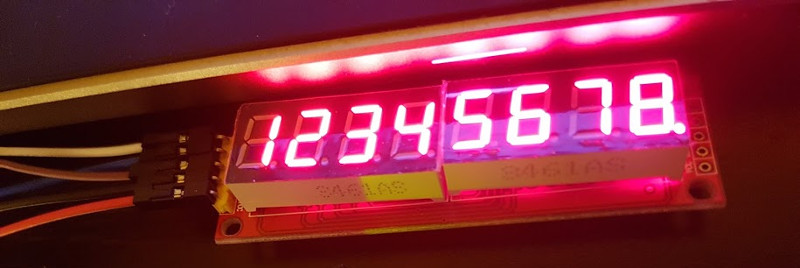
As the name suggests, it uses a MAX7219 to control the segment display.
In a previous post (Using external displays), we already mentioned about the MAX7219 to control an 8x8 LED matrix. Good thing, you can use the same driver (LED control library) to interact with this device via SPI.
Example: writing “0042”:
LedControl ledControl = new LedControl(SPI_NAME);
ledControl.setDigit(3, 0, false);
ledControl.setDigit(2, 0, false);
ledControl.setDigit(1, 4, false);
ledControl.setDigit(0, 2, false);
A lucky cat
We will use a Lucky Cat.
To move the cat’s paw, we simply need to attach the paw to a servo motor (here, using a rubber band).
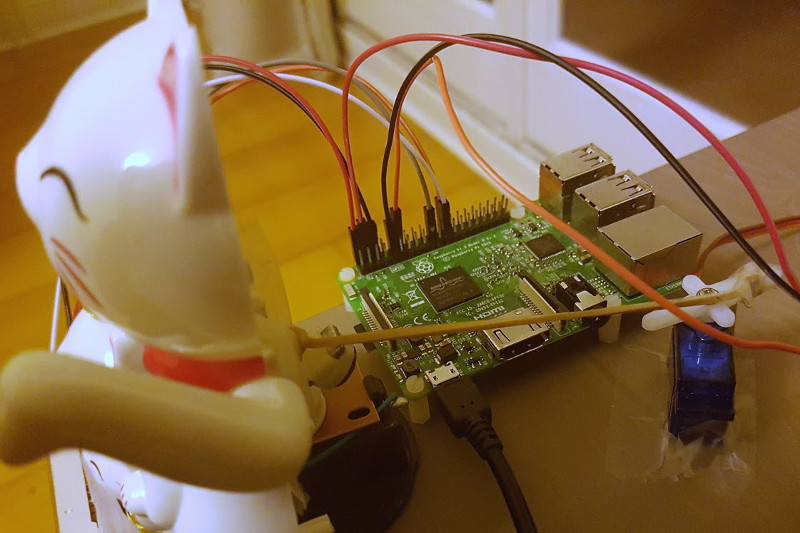
And then, we move the servo when the counter value changes:
Servo servo = new Servo(PWM_NAME);
servo.setPulseDurationRange(1, 2);
servo.setAngleRange(-90, 90);
servo.setEnabled(true);

servo.setAngle(servo.getMaximumAngle());
Thread.sleep(1000);
servo.setAngle(servo.getMinimumAngle());
An Android Wear app
This was not planned initially, but since it uses exactly the same APIs, it took me only 10 minutes to port (I mean copy/paste) the Android (phone) client to an Android Wear app.
Conclusion
Communicating via Bluetooth LE may seem quite complicated at first. You will need to write a lot of code to communicate via Bluetooth LE, but once you understand how it works, you’ll find out that it’s actually very verbose, for sure, but still straightforward and completely coherent with the Bluetooth LE specs.
To simplify the article, I did not handle edge cases (such as checking return values, enabling the Bluetooth if it is not enabled yet, etc.) here.
You can find a complete implementation on github.com/Nilhcem/blefun-androidthings.