Android Things - Using external displays
When creating smart devices with Android Things, you may need to display some content on a screen. This can be done in various ways depending on your needs.
In this blog post, we will compare five ways to display information on a screen, using different kind of external displays.
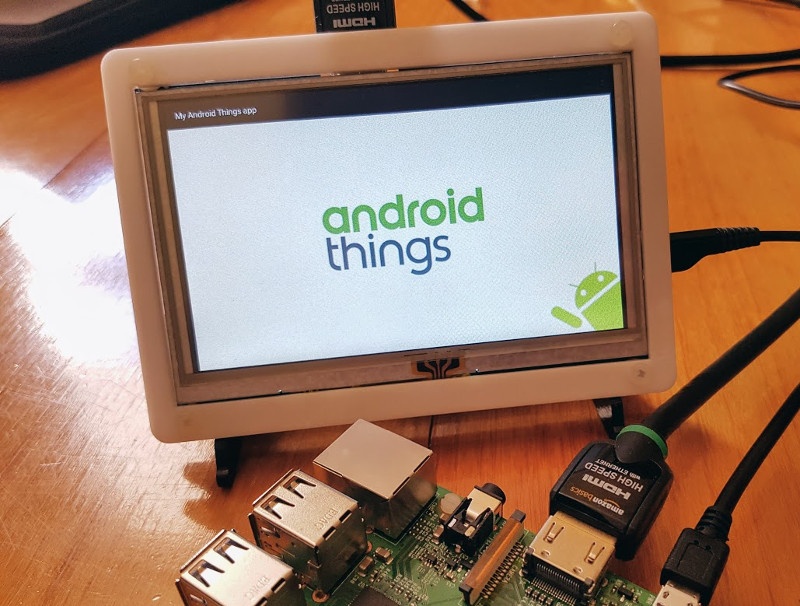
1. HDMI Display
Probably the easiest solution when you want to get started with Android Things.
If your board provides an HDMI port (the Raspberry Pi 3 does), simply connect it to a TV and you are done.
You can then use the Android framework to create Activities, inflate XML layouts, and manipulate your views the exact same way you already do in your Android phone / tablet projects.
@Override
protected void onCreate(Bundle savedInstanceState) {
    super.onCreate(savedInstanceState);
    setContentView(R.layout.main_activity);
    Textview textview = (TextView) findViewById(R.id.my_textview);

    textview.setText("Hello!!1!");
    textview.animate().scaleXBy(2.f).scaleYBy(2.f).setDuration(500L).start();
}
“a TV for an IoT project? #srsly?
While using a large TV could be ok during the development phase, you will probably want a smaller HDMI screen, such as the “Waveshare 5inch 800*480 LCD” you can buy for around $40.
To make the screen work on the Raspberry Pi 3, you’ll have to mount the Android Things SD card to your computer and modify the /boot/config.txt file to append the following lines:
max_usb_current=1
hdmi_group=2
hdmi_mode=1
hdmi_mode=87
hdmi_cvt 800 480 60 6 0 0 0
Using a small HDMI screen is a good idea if you are building a “pepper”/”buddy”-like robot.
While the Waveshare screen supports touch inputs over SPI. It does not work out of the box with Android Things yet.
If you need a screen that supports touch input, compatible with Android Things, you may consider buying the official Raspberry Pi screen.
Pros:
- Large color screen
- Easy to display content and animate views
Cons:
- Only suitable for large IoT projects
- The most expensive solution presented here
2. OLED Display
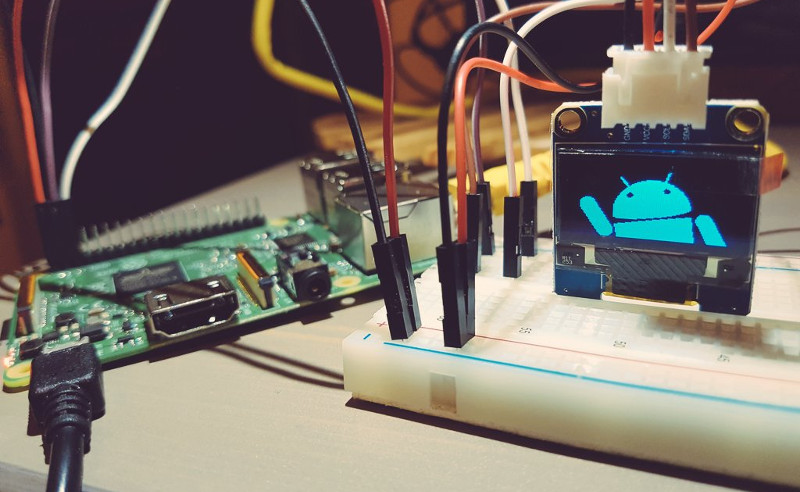
Much smaller than an HDMI screen, an OLED display can be a good alternative.
Here, the SSD1306, a monochrome 0.96inch screen, costs less than $10 and can be connected to the board via I²C.
An official driver is available on github, as well as a sample project.
The driver provides a setPixels(int x, int y, boolean on) method to let us turn pixels on easily.
As an example, the following code turns on 1 every 2 pixels:
ssd1306 = new Ssd1306(I2C_PORT);
ssd1306.clearPixels();
for (int x = 0; x < ssd1306.getLcdWidth(); x++) {
    for (int y = 0; y < ssd1306.getLcdHeight(); y++) {
        ssd1306.setPixel(x, y, (x % 2) == (y % 2));
    }
}
ssd1306.show();
You can use this method to create a fun maze game.
However, you’ll find out pretty quickly that setting pixels one by one can turn out to be quite a hassle. That’s one of the reasons why the driver also provides a BitmapHelper method to let us draw bitmaps on the screen easily.
Transparent / black pixels will be skipped.

Bitmap bmp = BitmapFactory.decodeResource(getResources(), R.drawable.android);
BitmapHelper.setBmpData(ssd1306, 0, 0, bmp, false);
Using the Bitmap API, we could also display some text via Paint and Canvas instances:
String text = "Hello!!1!";
Paint paint = new Paint(Paint.ANTI_ALIAS_FLAG);
paint.setTextSize(30f);
paint.setColor(Color.WHITE);
paint.setTextAlign(Paint.Align.LEFT);
Bitmap textAsBitmap = Bitmap.createBitmap(WIDTH, HEIGHT, ARGB_8888);
Canvas canvas = new Canvas(textAsBitmap);
canvas.drawText(text, 0, 0.5f * HEIGHT, paint);
BitmapHelper.setBmpData(ssd1306, 0, 0, textAsBitmap, true);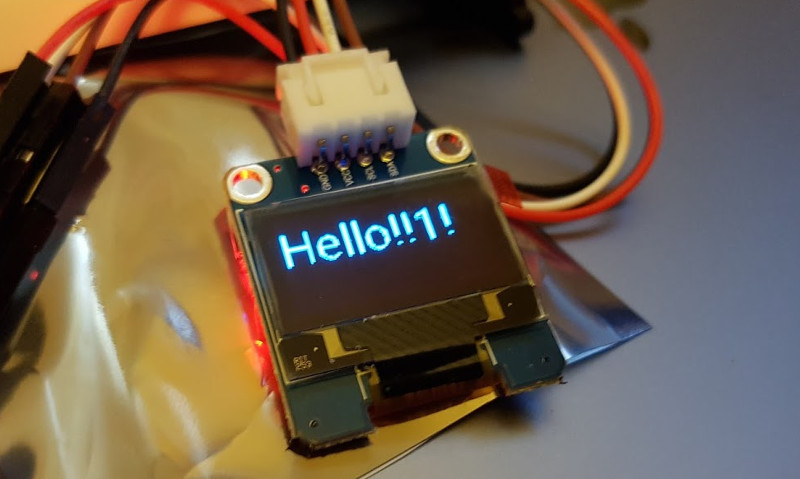
Pros:
- A nice display for around $10
- Easy to display content via the Bitmap API
Cons:
- Don’t expect to display a large amount of data
- If your font size is too small, the text won’t be very readable. You may need some very custom font, or a hack (explained in the next section) to render a small font via the Bitmap API
3. LED Matrix
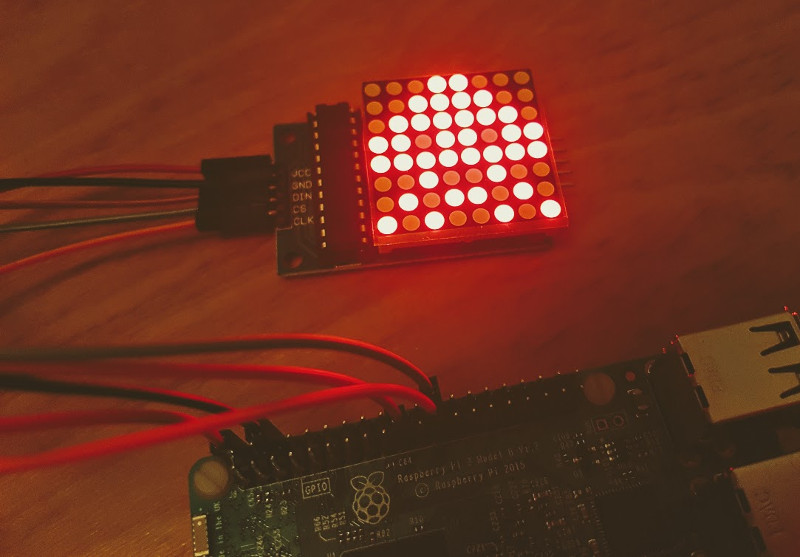
While technically different, you can use an LED matrix the same way you can interact with an SSD1306 OLED display: setting pixels on manually, or using the Bitmap API.
The only difference here is that, instead of manipulating 128x64 pixels (for the ssd1306), we will only manipulate 8x8 pixels. That’s quite a difference indeed.
The component in the picture above is a MAX7219 LED dot matrix module. There is no official driver for that module yet, so I’ve created one, available on github.com/Nilhcem/ledcontrol-androidthings
Here is how you can display a bitmap using this driver:
LedControl ledControl = new LedControl(SPI_NAME, 1);
Bitmap bmp = BitmapFactory.decodeResource(getResources(), R.drawable.image);
ledControl.draw(0, bmp);
You can also turn pixels on and off manually if you prefer via the setLed(int addr, int row, int col, boolean on) method.
How to display some text on an LED matrix?
To display some text on an LED matrix, we will use a hack, inspired by the python Sense Hat library source code:
First, you will add to your project a sprite sheet of a large range of characters
![]()
Then, you can create a textToBitmap(String message) method that will, for each character in the given message, search the associated Bitmap sprite and copy it to a new Bitmap at a given position (implementation here).

Finally, you can create a Handler that will simulate moving the bitmap from the right to the left of the matrix, copying only an 8x8 part of the bitmap using a moving cursor (implementation here).
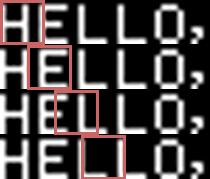
Full source code of a scrolling text with shaders on a SenseHAT RGB Led Matrix available on github.com/Nilhcem/ledmatrixfun-androidthings
Pros:
- Super-cheap (around $2)
- A unique retro style
Cons:
- Hacky, only suitable for a limited range of characters
- 8x8 pixels is pretty limited. But you can buy multiple dot matrices, and chain them
4. 7-Segment Display
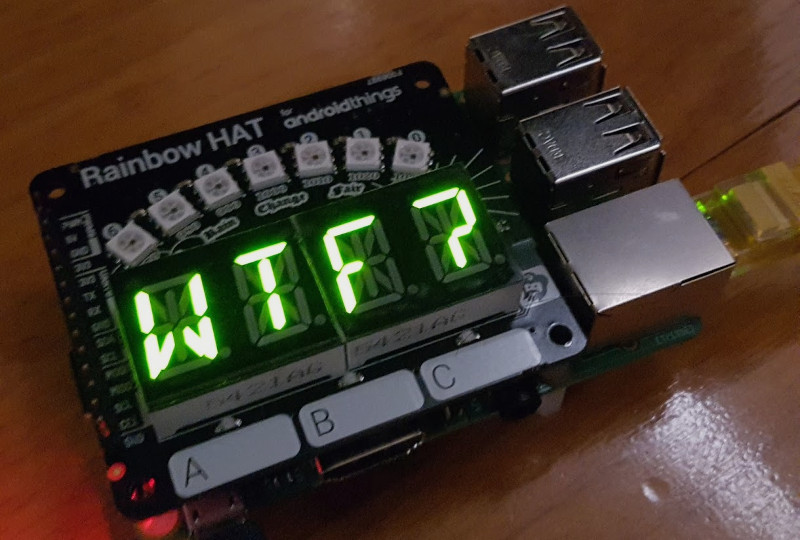
Technically, a 7-Segment display has a lot of similarities with an LED matrix. It is still about knowing which segments you want to turn on.
The MAX7219CNG display driver, used in some LED matrix modules could also be used for 7-segment displays.
There is an official numeric TM1637 driver as well as an alphanumeric HT16K33 driver (used by the RainbowHAT). You may have to create your own drivers if you use others.
AlphanumericDisplay segment = new AlphanumericDisplay(I2C_NAME)
segment.setBrightness(Ht16k33.HT16K33_BRIGHTNESS_MAX);
segment.setEnabled(true);
segment.display("WTF?");
Pros:
- Even cheaper than an LED matrix
- Driver makes it really easy to use. Perfect for displaying digits
Cons:
- Hacky, only suitable for a limited range of characters
- Limited space. Again, you may want to buy multiples and chain them
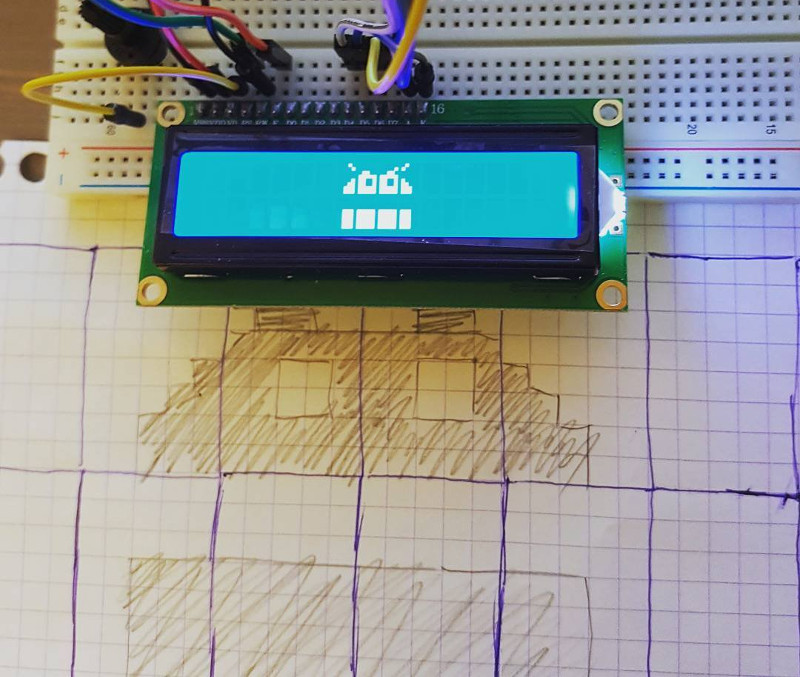
5. LCD Screen

Finally, a last way could be to use an LCD screen, such as the LCD module 1602A.
Again, there is no official driver for that one yet, but I’ve ported the LiquidCristal Arduino library for Android Things, and the driver is available on github.com/Nilhcem/1602A-androidthings
This component is ideal to display alphanumeric sentences.
Lcd1602 lcd = new Lcd1602(RS, EN, D4, D5, D6, D7);
lcd.begin(16, 2);
lcd.clear();
lcd.print("Hello,");
lcd.setCursor(0, 1);
lcd.print("Android Things!");
You also have the possibility to create up to 8 custom characters, drawing those pixels per pixels
int[] heart = {0b00000, 0b01010, 0b11111, 0b11111, 0b11111, 0b01110, 0b00100, 0b00000};
lcd.createChar(0, heart);
lcd.write(0);
Pro-tip: don’t try to be an artist, the result will be ugly. It will make you sad.
Pros:
- Cheap (around $2)
- Ideal for small sentences
Cons:
- Limited range of preset characters
- Limited to 8 custom characters. You can’t draw something custom over the whole surface of the screen
Conclusion
From less than $1 to more than $50, there are plenty of ways to display some information on an external display.
While some components are less intuitive to use than others, it’s overall still easy.
I’ve introduced in this article only a few components. If you buy some which are not listed here, you will probably have to create your own drivers.
If that happens, I suggest you to find an implementation for a different platform (e.g. Arduino) and port the source code to Android Things.
It may take you some time, but at the end, you will be happy to use the component with your home-made driver on your projects.