IoT - An introduction to Device Actions for the Google Assistant
The Google Assistant SDK lets you embed the Google Assistant in your devices to bring voice control, natural language understanding, and more.
It has gained a lot of popularity lately, with the AIY Projects Voice Kit: a fully functional do-it-yourself Google Home, made of cardboard.

To embed the Google Assistant in your projects, you can use either:
- The Google Assistant Library, a Python library which is perfect for prototyping quickly, such as building an AIY Voice Kit device… or you can use
- The Google Assistant Service, a gRPC API that generates bindings for many languages, such as Go, Java, C#, Node.js or Ruby.
These 2 APIs are very similar in terms of features. The Python library is a little more advanced though, as it provides hands-free activation (“Ok Google”). With the gRPC API, you need to manually press a button (either physical or digital) to use the Google Assistant; however, you will be able to target more platforms.
While the idea of embedding the Google Assistant in your physical devices sounds nice, there was a huge limitation until recently: the Google Assistant could not interact directly with the device that embeds it. Hence, if your device is a TV embedding the Google Assistant, pronouncing something like:
“Ok Google, turn off”
was impossible. You could either make your device compatible with Actions on Google Smart Home (that requires creating an Actions on Google project, and providing both an OAuth server and a backend server), and say:
“Ok Google, turn off the TV”
or you could create an Actions on Google app, using DialogFlow for instance, and say
“Ok Google, talk to my TV, turn off”
so that DialogFlow could contact your device, usually through an external web service.
Those solutions take time to implement, and the last one is very verbose and not intuitive to use.
Hopefully, this issue is getting fixed, with the Device Actions feature from the latest version of the Google Assistant SDK.
Device Actions
Device Actions are a way for the Google Assistant to:
- understand that you are referring to the device that is embedding the Assistant
- transmit the desired action to the device, without intermediaries.
To understand that the “Ok Google, change the color to blue” sentence is referring to the device you are talking to, the Google Assistant has to be aware of that device and all the functionalities it supports (known as Traits).
This is the reason why, to be able to embed the Google Assistant, a device has to register first with a list of traits it supports.
Traits are predefined and you can find the complete list of supported traits in the official documentation.
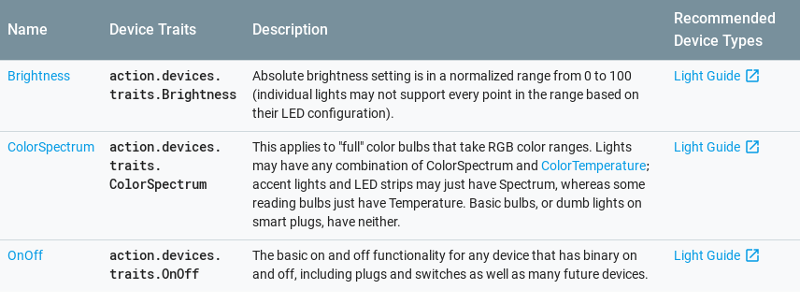
If you want to be able to turn on/off a device via the Google Assistant, you need to register it as supporting the OnOff trait.
If you want to be able to change its color through the Google Assistant, the device needs to support the ColorSpectrum trait.
Last example, if your device is capable of changing the temperature of your room, then don’t forget to specify the TemperatureSetting trait when registering your device.
Let’s build a device
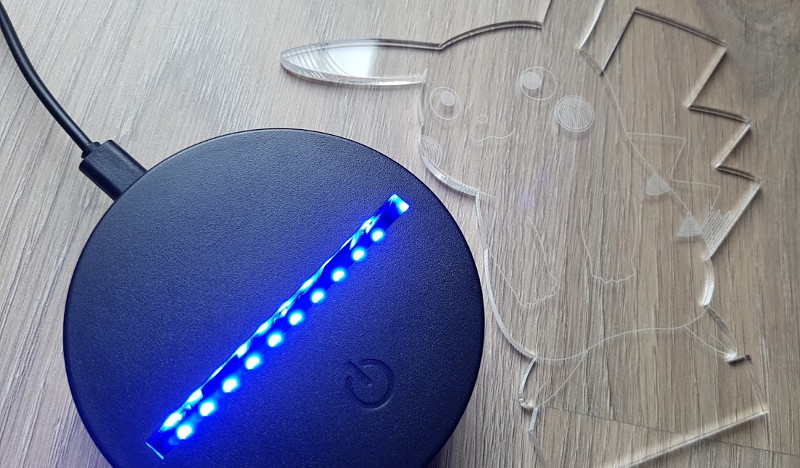
We will build a 3D lamp powered by Android Things, and embedding the Google Assistant.
We will support Device Actions, so that users will be able to turn on/off the lamp and change the color or the brightness just by talking to the Assistant.
A 3D lamp is made of:
- A laser-cut acrylic sheet (Plexiglas). I bought mine on aliexpress.
- Some RGB LEDs that light up the acrylic from below
For the LEDs, I opted for the Pimoroni Blinkt!, a very simple board composed of 8 RGB LEDs you can control using 4 wires (VCC, GND, DATA, CLOCK)

To control the LEDs, you can import the Blinkt! driver for Android Things, instantiate the component, and send an array of 8 colors, one per LED:
val blinkt = Blinkt()
val colors = IntArray(8) { Color.RED }
blinkt.write(colors)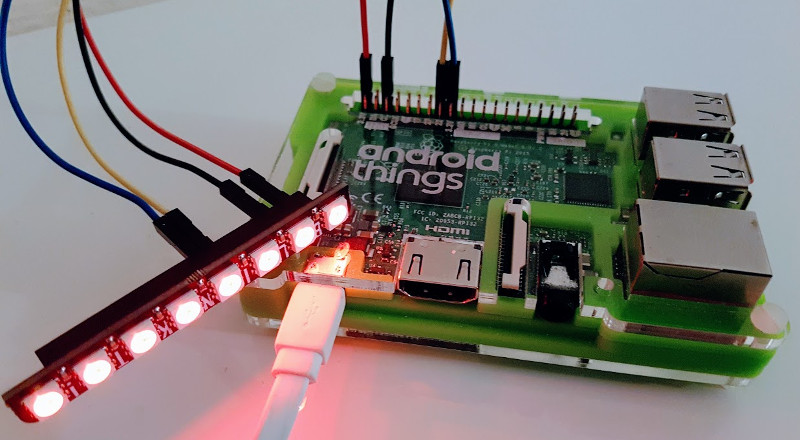
To activate the Google Assistant, I decided to use a capacitive touch sensor (MPR121 Android Things driver) and a copper wire:

Using Android Things makes it easy and fast to build devices. A few minutes later, the device is now capable of turning on/off some LEDS to any specified color and handling touch events.
Registering the device to the Google Assistant
We want to be able to use the Google Assistant to control the 3D lamp and change its color and brightness. First, we need to register the device to tell that it supports the OnOff, ColorSpectrum and Brightness traits.
To register a device, Google provides a Python tool and a REST API. Choose the one you prefer.
Update: There is now an easier way to register devices, using the Google Assistant Developer Console.
More information on this link.
We will use the Python command line tool, as it is a good choice to get started quickly.
The first command we have to execute is to register a device model, which is an abstraction representing what our device can do.
Our 3D lamp is a kind of LIGHT device supporting the OnOff, ColorSpectrum, and Brightness traits:
googlesamples-assistant-devicetool register-model \
    --manufacturer "Assistant SDK developer" \
    --product-name "3D Lamp" \
    --type LIGHT \
    --trait action.devices.traits.OnOff \
    --trait action.devices.traits.ColorSpectrum \
    --trait action.devices.traits.Brightness \
    --model my-google-project-id-3dlamp
The device model name (here: my-google-project-id-3dlamp) must be globally unique. It is a good idea to use your Google Developer Project ID as a prefix to help avoid collisions.
For more information about the command line arguments, you can refer to the registration tool reference.
Once we have created a device model, we can register a specific device instance matching this model, with the following command:
googlesamples-assistant-devicetool register-device \
    --client-type SERVICE \
    --model my-google-project-id-3dlamp \
    --device device01
The device name (here: device01) must be a unique device instance ID within all of the devices registered under the same Google Developer project.
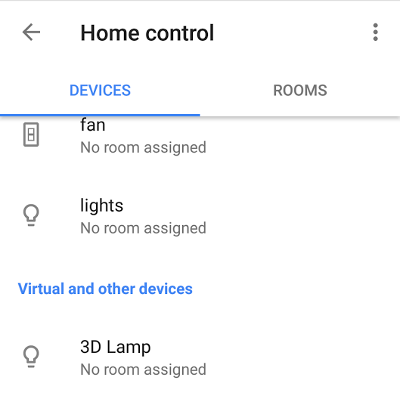
Our 3D Lamp device is now registered and we can see it in the Google Home app
Now we can embed the Google Assistant SDK in our device, and start receiving Device Actions.
Configuring the Google Assistant SDK
We first need to embed the Google Assistant Service gRPC protobuf definition files and initialize the Google Assistant SDK, specifying the Assistant language (en-US), the device instance (device01) and the device model (my-google-project-id-3dlamp):
AssistConfig.newBuilder()
    .setAudioInConfig(ASSISTANT_AUDIO_REQUEST_CONFIG)
    .setAudioOutConfig(ASSISTANT_AUDIO_RESPONSE_CONFIG)
    .setDialogStateIn(DialogStateIn.newBuilder()
      .setLanguageCode("en-US")
      .build()
    )
    .setDeviceConfig(DeviceConfig.newBuilder()
      .setDeviceId("device01")
      .setDeviceModelId("my-google-project-id-3dlamp")
      .build()
    )
    .build()
Receiving Google Assistant Responses
For each user request, the Google Assistant Service is sending our application responses in an AssistResponse object.
This object can contain:
- an
AudioOutobject containing the audio data to play, so that the user can hear the audio response of the Google Assistant - a
List<SpeechRecognitionResult>object containing a transcript of the user request, nice for debugging purposes - a
DeviceActionobject containing a JSON data when a user asked to perform an action on your device.
When we receive an AssistResponse, we play the audio, check if there are any device actions and if so, we deserialize the JSON data:
private val responseObserver = object : StreamObserver<AssistResponse>() {
    fun onNext(value: AssistResponse) {
        if (value.hasAudioOut()) {
            playAudio(value.audioOut)
        }

        if (value.hasDeviceAction()) {
            val json = value.deviceAction.deviceRequestJson
            liveData.postValue(JSON_ADAPTER.fromJson(json))
        }
    }
}
The JSON data differs depending on the action. You can find an example of data for each trait in the official documentation.
For the “Set my light to red” action, we will receive the following JSON:
{
  "requestId": "ff36a3cc-ec34-11e6-b1a0-64510650abcf",
  "inputs": [{
    "intent": "action.devices.EXECUTE",
    "payload": {
      "commands": [{
        "devices": [{
          "id": "123"
        }],
        "execution": [{
          "command": "action.devices.commands.ColorAbsolute",
          "params": {
            "color": {
              "name": "red",
              "spectrumRGB": 16711680
            }
          }
        }]
      }]
    }
  }]
}
If you are familiar with Actions on Google Smart Home, you may have noticed that this JSON response is not identical, but very similar.
We have to deserialize it, take the spectrumRGB value, and forward it to the LED strip.
if (execution.command == "action.devices.commands.ColorAbsolute") {
    ledstrip.setColor(execution.params.color.spectrumRGB)
}
We can now handle the OnOff and BrightnessAbsolute traits the same way.
Video
Below is a video of our Android Things-powered device, embedding the Google Assistant with Device Actions:
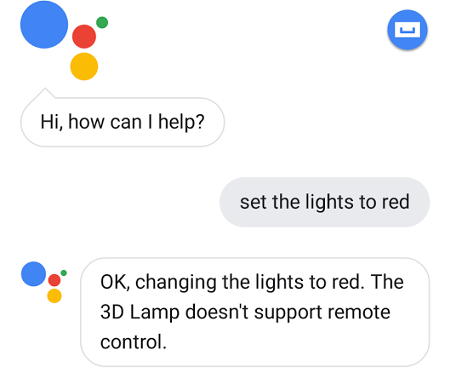
Can I control this device from another Google Assistant?
The answer is no. You won’t be able to change the color from, for instance, your Google Home.
A device registered with the Google Assistant SDK won’t support remote control:
Conclusion
The Google Assistant SDK is currently in version v1alpha2. This release is the first one supporting Device Actions.
The French version of the assistant is not working as well as the English version is to control embedded devices, and Device Actions only support a limited set of traits at the moment.
Update: Device Actions now support custom traits. See here for additional information.
However, for an alpha release, it is stable, fast to implement and looks really promising.
Device Actions simplify a lot controlling a device from the Google Assistant. It sends us directly JSON data to control our device, removing the intermediaries.
If your device is already integrating the Google Assistant SDK, and you do not need remote control, you should definitely use this option instead of Actions on Google projects.
However, if you are a building devices (such as smart light bulbs) that need to be compatible with any Google Assistant, you should consider building an Actions on Google Smart Home project instead.
For more information about Smart Home, you can take a look at this article:
Home Automation with Android Things and the Google Assistant.
The 3D lamp source code is available on github.com/Nilhcem/device-actions-androidthings.
In the README file, you will find all the information to tell you how to create a Google Assistant project and how to configure your dev environment to install the registration tools.