IoT - Home automation with Android Things and the Google Assistant
The Google Home is a nice device powered by the Google Assistant that provides a conversational interface to Google. Ask it questions or tell it to do stuff, and it will make your life easier at home.
If you own some compatible devices, such as a Nest thermostat, or some Philips Hue lights, it can connect seamlessly and let you control those with your voice.
“Hey Google, dim the lights by 10%”
Pretty cool, huh? But what if you don’t own any compatible devices, or even want to create your own devices that can be controlled by the Google Assistant?
Good news, it is possible to create “Actions on Google” that extend the assistant by creating your own apps, available to everyone. To start those apps, say something like “Ok Google, talk to [the-name-of-your-app]”
user: “OK Google, talk to Domino’s”
home: “Sure, here’s Domino’s”
home: [voice changes] “Hi, this is Dominos’s I can help you with […] what do you want today?”
You can therefore create your own app for the Google Assistant that will control any of your devices
user: “Hey Google, talk to “my personal home app””
home: “Sure, here’s “my personal home app””
home: [voice changes] “What do you want to do?”
user: “Turn the lights on”
Huge problem here: we are wasting too much time to do a simple action. Hopefully, we can also say something like:
“Hey Google, talk to “my personal home app” to turn the lights on”
But seriously, who wants to talk for so long, just to turn on some lights? It would be much nicer if the home automation was directly done by the Google Assistant itself, and not by using a separate app. Exactly like what you can do with compatible smart home devices, so you can simply say:
“Hey Google, turn on the lights”
and it would work even for your own smart devices. Guess what? This is exactly what you can do with Smart Home for the Google Assistant. After all, the assistant should be at the center of driving intelligent interactions with IoT devices.
In this post, we will create our own smart device and write some functions so that it can be controlled directly by the Google Assistant.
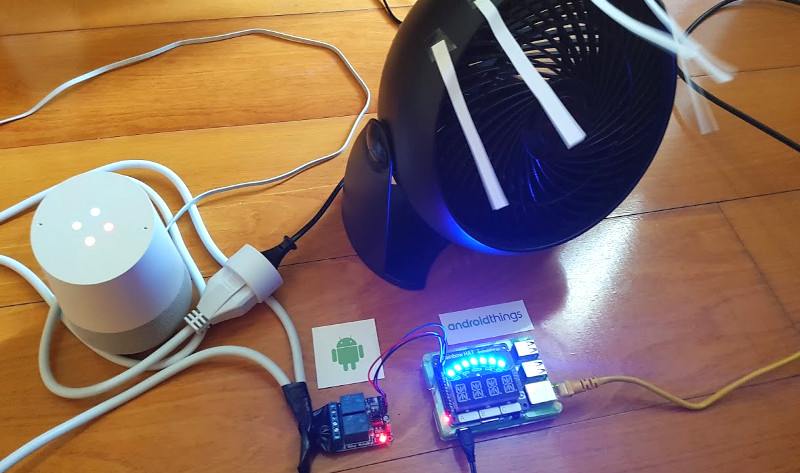
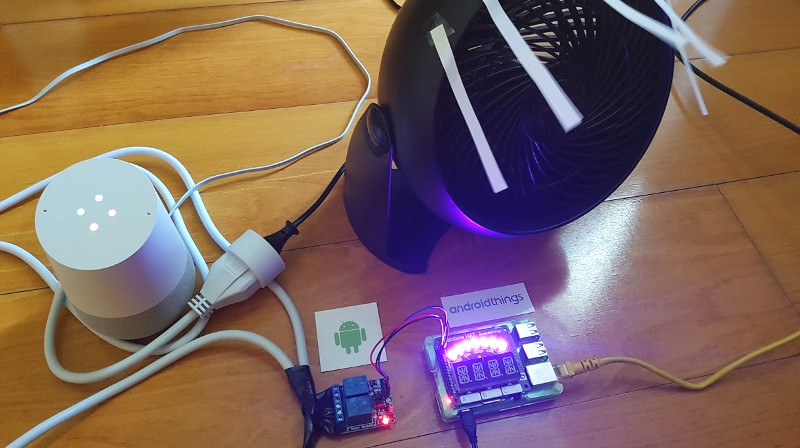
The device will be composed of an electric fan and an LED strip, both powered by Android Things.
Here’s a video of what we will achieve, using a Google Home to control our own smart device:
Getting started
This article gives you an overview of all the steps you need to follow to create your own smart devices controlled by the Google Assistant. However, it is not exhaustive. If, after reading the article, you want to start creating your Smart Home devices, I invite you to take a look at those two valuable resources:
- Official Smart Home documentation
- Home Automation with the Google Assistant (Google I/O ‘17) [youtube]
Creating the physical device
First, let’s create our smart device.
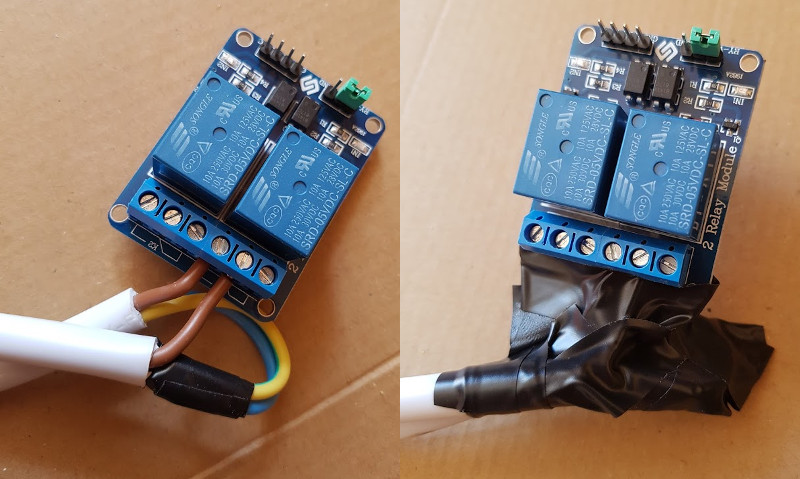
The device will control an LED strip (to simplify the wiring, we will use a Rainbow HAT instead), and a fan. To simplify programmatically control high voltage devices (such as an electric fan), we will use a Relay Module:
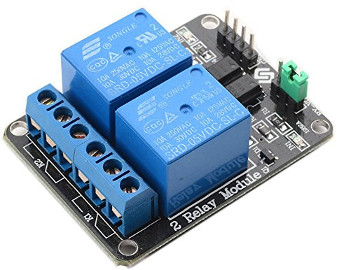
A relay is an electrically operated switch of mains voltage. It can be turned on or off, letting the current go through or not.
Controlling a relay is as simple as controlling a basic GPIO device, such as an LED:
// Turn on the fan
relay.value = true

// Turn off the fan
relay.value = false
We only need to call the setValue(boolean on) method to turn on or off the fan. Easy!
This relay module can control 2 separate devices. It has 4 different pins that need to be connected to the Android Things board:
- GND: Goes to ground
- VCC: To 5V
- IN1: To a GPIO (e.g. BCM18 on the RPi3). This is the input of the first relay
- IN2: Input of the second relay. We won’t need this one, as we only use 1 relay.
Now, we need to plug the fan to the relay.
Warning: We are going to manipulate high voltage devices here. Be careful. In doubt, don’t do it.
Never touch live parts when power is applied to the relay. Doing so may cause electrical shock.
Make sure that the power is turned off when manipulating electric wires.
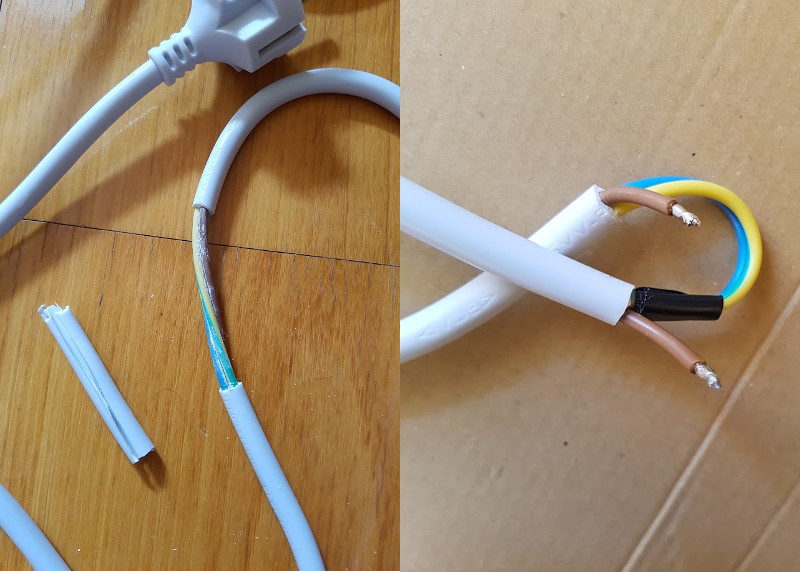
Instead of connecting the fan directly to the relay module, we will connect a power extension cord to the module, and connect the fan to the extension cord. That way, if the weather’s getting too cold, we plug off the fan, and replace it by a heater in a few seconds.
First, let’s open the extension cord, and cut only the phase cable (the brown wire in the EU).
Each relay in this module has 3 possible connections:
- COM: Common pin
- NO: Normally Open
- NC: Normally Close
You will have to connect one side of the phase wire to the COM, and the other side to either the NO or NC.
We want to occasionally turn on the fan, so basically we always want an opened circuit (fan is off). When we set the relay GPIO value to true, it closes the circuit and activates the fan. Therefore, we will connect the other side of the brown cable to the NO (Normally Open), and cover everything using insulating tape.
The physical device is done. Now let’s write some code
Using Firebase
We’ll be using a Firebase database, with the following model:
{
  "fan" : {
    "on" : false
  },
  "lights" : {
    "on" : true,
    "spectrumRGB" : 16510692
  }
}
The Android Things app will listen to Firebase changes to be notified each time a value has changed.
The spectrumRGB holds a color hex value (LED color in RGB) as integer.
Android Things app
The Android app will be listening to Firebase changes when active.
We will create 2 LiveData objects (one for the fan, one for the lights), and we update the LiveData value when there is a change on Firebase.
class FanLiveData(val firebase: DatabaseReference) : LiveData<FanState>() {

    private val valueEventListener = object : ValueEventListener {
        override fun onDataChange(snapshot: DataSnapshot) {
            val isOn = snapshot.child("on").getValue(Boolean::class.java)
            value = FanState(isOn)
        }

        override fun onCancelled(error: DatabaseError) { /*handle*/}
    }

    override fun onActive() {
        firebase.child("fan").addValueEventListener(valueEventListener)
    }

    override fun onInactive() {
        firebase.child("fan").removeEventListener(valueEventListener)
    }
}
In the MainActivity, we observe the 2 LiveData instances, and call methods from a MainBoardComponents object when a livedata value changes:
fanLiveData.observe(this, Observer { fanState ->
    boardComponents.setFanOn(fanState?.isOn ?: false)
})

lightsLiveData.observe(this, Observer { lights -> lights?.let {
    boardComponents.setLights(it)
}})
The MainBoardComponents class will manipulate physical components, such as the fan and the LED strip:
class MainBoardComponents : LifecycleObserver {

    private lateinit var relay: Gpio
    private lateinit var ledstrip: Apa102

    @OnLifecycleEvent(Lifecycle.Event.ON_CREATE)
    fun onCreate() {
        relay = PeripheralManager.getInstance().openGpio("BCM18")
        relay.setDirection(Gpio.DIRECTION_OUT_INITIALLY_LOW)
        relay.setActiveType(Gpio.ACTIVE_LOW)

        ledstrip = RainbowHat.openLedStrip()
        ledstrip.brightness = 1
    }

    fun setFanOn(on: Boolean) {
        relay.value = on
    }

    fun setLights(lights: Lights) {
        val color = if (lights.isOn) lights.spectrumRGB else 0
        ledstrip.write(IntArray(RainbowHat.LEDSTRIP_LENGTH, { color }))
    }

    @OnLifecycleEvent(Lifecycle.Event.ON_DESTROY)
    fun onDestroy() {
        ledstrip.close()
        relay.close()
    }
}
And that’s all we need. As you can see, we don’t have to write too much code to make everything work.
Now, we will integrate this homemade IoT device to the Google Assistant.
Basically, when a user wants to activate the fan, he will talk to the Google Assistant; the latter will modify some Firebase data. Since our IoT device is listening to database changes, the fan will automatically be turned on when the fan.on value has been changed from false to true.
Actions on Google, and account linking
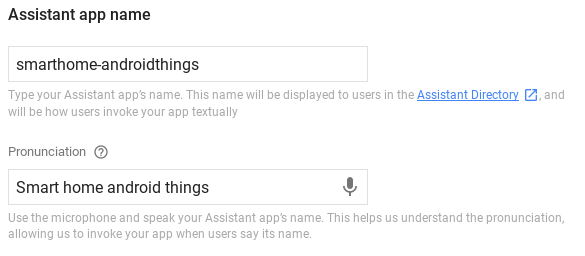
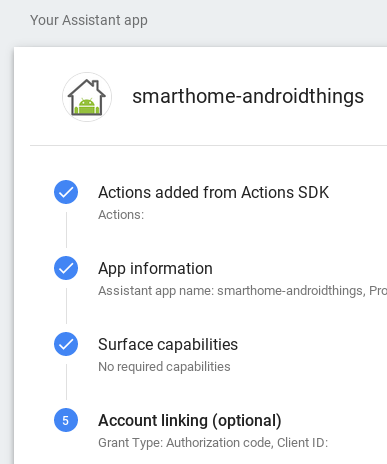
In order, for the Google Home, to be aware of our smart fan, we first need to create an “Actions On Google” project on the Actions console. Here, the project will be titled “Smart home android things”:
Once the project is created and available for testing, we can start the Google Home Android app, navigate to the Google Home settings and select “Add device” to associate your IoT device to the Google Assistant
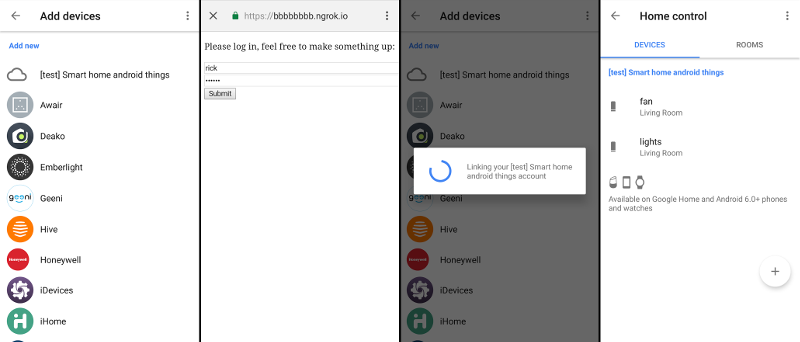
At that point you should be able to see your test device among officially supported devices. Once you select a device, the user has to authenticate, so the Google Home app will start a WebView to your custom authentication server. Once authenticated, the auth server will give Google a valid OAuth2 Bearer token.
Later, when you will want to, for example, turn on the fan, Google will call your endpoint with this token, so that your service can know which fan it should activate.
And, as you have guessed now, we will need an OAuth2 server.
OAuth2 server
If, like me, you are only at the prototype stage (e.g. you are starting to create a smart device, or just want to test Google Smart Home), you may not have an OAuth2 server on production yet.
Instead of spending some time to implement one, for testing purposes, you can use a fake (mock) OAuth2 server.
The official Smart Home sample contains a fake OAuth2 server you can use for that need.
Feel free to use it, or use my simplified fork instead (same stuff, but the code on my fork is easier to read).
If you are using the simplified fork, you just need to run npm install start to have a fake OAuth2 server deployed locally.
Then, use ngrok (ngrok http 3000) to expose this local server to the Internet and receive the exposed endpoint.
In the Actions on Google console, specify account linking information (mandatory for Smart Home Actions) using your OAuth2 server URL.
Home actions endpoint
When you ask your assistant to “Turn on the fan”, it will use the bearer Token and call a specific endpoint.
To specify which endpoint the Google Assistant should call, you need to create an action.json similar to the one below, with your endpoint URL:
{
  "actions": [{
    "name": "actions.devices",
    "deviceControl": {
    },
    "fulfillment": {
      "conversationName": "automation"
    }
  }],
  "conversations": {
    "automation" :
    {
      "name": "automation",
      "url": "https://example.com/ha"
    }
  }
}
Then, upload this action file using the following command:
gactions update --action_package action.json --project <GOOGLE_CLOUD_PROJECT_ID>
Here, the Google Assistant will call the following service endpoint: https://example.com/ha.
This web service will receive parameters (intents) from Google and will query/modify the Firebase database depending on those parameters.
Handle Google Assistant intents
The Google Assistant will call your service with 3 different possible intents:
action.devices.SYNC: Requests the list of devices that the user has connected and are available for use. Earlier, when we associated our IoT device using the Google Home app, it detected automatically a fan and some lights simply because the SYNC intent was sent.action.devices.QUERY: Queries for the current states of devices (so the assistant can answer questions like “Is my fan on?”)action.devices.EXECUTE: Requests a command to execute on Smart Home devices (“Turn on the fan”)
You can use the stack you want to create the web service that will handle those intents. I decided to use a Google Cloud Function (GCF), as it is an easy way to publish code triggered by HTTP calls.
(Note: I could also have used “Cloud Functions for Firebase” instead, which slightly simplifies the Firebase initialization, but since I only needed HTTP trigger functionalities, GCF was fine).
Here is a simplified Google Cloud Function to handle intents sent by the Google Assistant:
exports.ha = function(req, res) {
    let authToken = req.headers.authorization ? req.headers.authorization.split(' ')[1] : null;
    let intent = req.body.inputs[0].intent;

    switch (intent) {
        case "action.devices.SYNC":
            sync(req, res);
            break;
        case "action.devices.QUERY":
            query(req, res);
            break;
        case "action.devices.EXECUTE":
            execute(req, res);
            break;
    }
}
Now, let’s take a look at each intents implementation
SYNC
When the action.devices.SYNC intent is called, we need to return the device(s) type(s) and traits.
Some device types examples:
action.devices.types.LIGHT: A light bulbaction.devices.types.OUTLET: Any outlet deviceaction.devices.types.SWITCH: A switch deviceaction.devices.types.THERMOSTAT: A thermostat
Some traits examples:
action.devices.traits.OnOff: The basic on and off functionality. This is good for both our fan and our lightsaction.devices.traits.Brightness: Useful if you want the assistant to control your device’s brightnessaction.devices.traits.ColorSpectrum: ‘Full’ color bulbs that take RGB color ranges.action.devices.traits.ColorTemperature: ‘Warmth’ bulbs that take a color point in Kelvin.action.devices.traits.TemperatureSetting: For thermostats to handle both temperature point and modes.
We can control 2 different devices:
- A fan (id=”1”), which is a
SWITCHdevice with theOnOfftrait. - Some lights (id=”2”), a
LIGHTdevice with both theOnOffandColorSpectrumtraits.
Below is the full sync() implementation that returns a JSON listing devices and traits:
function sync(req, res) {
    let deviceProps = {
        requestId: req.body.requestId,
        payload: {
            devices: [{
                id: "1",
                type: "action.devices.types.SWITCH",
                traits: [
                    "action.devices.traits.OnOff"
                ],
                name: {
                    name: "fan"
                },
                willReportState: true
            }, {
                id: "2",
                type: "action.devices.types.LIGHT",
                traits: [
                    "action.devices.traits.OnOff",
                    "action.devices.traits.ColorSpectrum"
                ],
                name: {
                    name: "lights"
                },
                willReportState: true
            }]
        }
    };
    res.status(200).json(deviceProps);
}
QUERY
To answer questions such as “Is my fan on?”, the Google Assistant will call our endpoint with the action.devices.QUERY intent. Here, we will query our Firebase data and return a valid json.
Here is the full implementation:
function query(req, res) {
    getDevicesDataFromFirebase(devices => {
        let deviceStates = {
            requestId: req.body.requestId,
            payload: {
                devices: {
                    "1": {
                        on: devices.fan.on,
                        online: true
                    },
                    "2": {
                        on: devices.lights.on,
                        online: true,
                        color: {
                            spectrumRGB: devices.lights.spectrumRGB
                        }
                    }
                }
            }
        };
        res.status(200).json(deviceStates);
    });
}

function getDevicesDataFromFirebase(action) {
    admin.database().ref().once("value", snapshot => {
        let devices = snapshot.val();
        action(devices);
    });
}
EXECUTE
Finally, when users ask the Google Assistant to execute an action on a device, the action.devices.EXECUTE intent is called.
This is where we can modify our Firebase data (remember, when a data is modified, the IoT device will immediately trigger the action). Here’s a simplified implementation:
function execute(req, res) {
    getDevicesDataFromFirebase(devices => {
        let reqCommand = req.body.inputs[0].payload.commands[0];
        let command = reqCommand.execution[0].command;
        let params = reqCommand.execution[0].params;
        let deviceId = reqCommand.devices[0].id;

        if (command === "action.devices.commands.OnOff") {
            if (deviceId === "1") {
                devices.fan.on = params.on;
            } else if (deviceId === "2") {
                devices.lights.on = params.on;
            }
        } else if (command] === "action.devices.commands.ColorAbsolute") {
            if (deviceId === "2") {
                devices.lights.spectrumRGB = params.color.spectrumRGB;
            }
        }

        admin.database().ref().set(data);
        sendResponse(req, res);
    });
}
You are not obliged to use Firebase. If you prefer to use PubSub, or any other service to notify your IoT device, feel free to.
Testing your implementation
If you want to test your implementation before publishing it, you can use some tools such as Postman, or directly the mock-assistant-platform project in the official actionssdk-smart-home-nodejs sample:
node platform.js [sync|query|exec]
This project sends a request to your endpoint with a valid format.
When everything is tested and ok, go to the Actions on Google console to publish your project as a test project. Once published as a test project, you can use your Google Home and start testing in real conditions. If you own an Android Wear 2 device, try using the Google Assistant from your watch to control your home devices, you’ll see, this works too.
A note on security
This article is a demonstration of what you can quickly achieve with Smart Home and the Google Assistant.
You should obviously add some Firebase security rules and authenticate to Firebase from your Android Things device before using it on production.
Conclusion
Using Android Things, Firebase, and Cloud Functions helped me to prototype a Smart Home device integrated to the Google Assistant very quickly.
With Smart Home, we only have to provide a lightweight layer of cloud services, while Google provides the language understanding, home graph, detailed handling of each kind of device, i18n, context, error management. All that is handled by Google.
This article does not cover every step you will have to implement, but I hope it gives you already some better understanding of what you can achieve with smart home actions for the Google Assistant. Again, consult the official documentation, and the presentation during I/O 2017.
The full project is available on GitHub at:
github.com/Nilhcem/smarthome-androidthings