Android Things - Control your devices through voice with USB Audio support
Android Things Developer Preview 2 comes with support for USB audio, which means it is now possible to play music on external USB speakers, and also record audio via a USB microphone.
This is a perfect occasion to create a very simple, stupid Android Things audio assistant, with offline speech recognition, and text-to-speech capabilities.
“Ok Things, what time is it?”
Similar to “Alexa”, or “Ok Google”, our smart device should always be listening for the “Ok Things!” key phrase. Once detected, the device should recognize the given command, and use Text-To-Speech to output results.
Below, a demonstration video of what we are going to achieve:
Give voice to our device (Text-To-Speech)
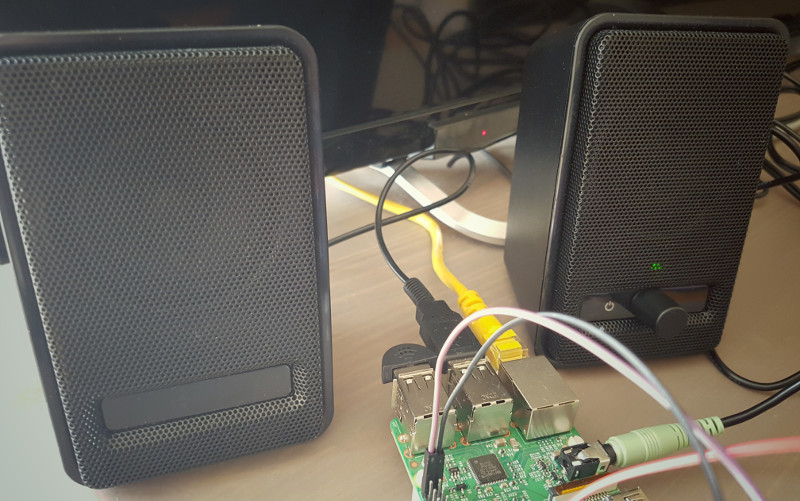
First things first, we should connect some speakers to the Android Things board.
You don’t need to have USB audio speakers. An HDMI TV, or standard 3.5mm jack speakers will do the job too.
The speakers I own (AmazonBasics A100) are USB powered which is convenient as I can directly power those from the Raspberry Pi.
To give voice to our device, we will use Android’s Text-To-Speech (TTS) API.
This API is easy to use, start initializing the TTS engine:
ttsEngine = new TextToSpeech(context, new TextToSpeech.OnInitListener() {
  @Override
  public void onInit(int status) {
    if (status == TextToSpeech.SUCCESS) {
      ttsEngine.setLanguage(Locale.US);
      ttsEngine.setPitch(1f);
      ttsEngine.setSpeechRate(1f);
    } else {
      Log.w(TAG, "Could not open TTS Engine (onInit status=" + status + ")");
      ttsEngine = null;
    }
  }
});
Once initialized, we can call the following method each time we want our device to speak:
ttsEngine.speak("text to speak", TextToSpeech.QUEUE_ADD, null, "UTTERANCE_ID");No additional steps required! Giving offline voice to our Android Things device is only a few lines of code.
Add some voice recognition (Speech-To-Text)
Now things are getting complicated. We will add some voice recognition, using Speech-To-Text (STT).
Obviously, you’ll need a USB microphone. I bought the MI-305 for around $5.
Connect it to one of the Raspberry Pi USB ports, and it works out of the box.

There are several ways to add some voice recognition to our apps.
The ideal one, on Android, is to start the speech RecognizerIntent action.
private void startSpeechToTextActivity() {
  Intent intent = new Intent(RecognizerIntent.ACTION_RECOGNIZE_SPEECH);
  intent.putExtra(RecognizerIntent.EXTRA_LANGUAGE_MODEL, "en-US");

  try {
    startActivityForResult(intent, SPEECH_REQUEST_CODE);
  } catch (ActivityNotFoundException a) {
    Log.e(TAG, "Your device does not support Speech to Text");
  }
}
And override onActivityResult to receive the speech recognizer data
@Override
protected void onActivityResult(int requestCode, int resultCode, Intent data) {
  super.onActivityResult(requestCode, resultCode, data);

  if (requestCode == SPEECH_REQUEST_CODE) {
    if (resultCode == RESULT_OK && data != null) {
      List<String> result =
        data.getStringArrayListExtra(RecognizerIntent.EXTRA_RESULTS);
      String spokenText = result.get(0);
    }
  }
}
Simple code, and very well integrated into the Android framework thanks to an onActivityResult callback.
If you have already used it, you probably know how well it works on our Android phones.
Well… unfortunately, on Android Things, when we use this intent, we receive the following message:
Your device does not support Speech to Text
In a near future, I’m pretty sure we will have built-in Speech to Text support.
We could wait for this day to come, but we are impatient. Now that USB audio is supported, we would like to play with it right now.
That’s why I decided to experiment with three different solutions:
Solution #1: The “Quick & Dirty” way
Blah blah blah our device does not support Speech-To-Text. This is not something that can stop us.
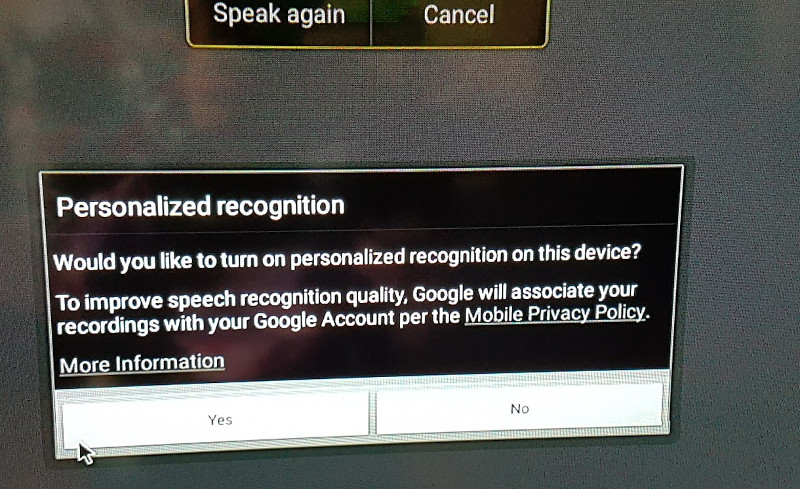
Let’s install this capability manually, downloading Google’s voice search apk and installing it on the Raspberry Pi
First, we use the Play Store website to install the application on our phone. Then we use adb to know where the freshly installed apk is located and pull it to our computer. Finally, we uninstall the app (because we don’t need it on our phone).
$ adb shell pm path com.google.android.voicesearch
package:/data/app/com.google.android.voicesearch-1/base.apk
$ adb pull /data/app/com.google.android.voicesearch-1/base.apk
$ adb uninstall com.google.android.voicesearch
Now that we have our google-voice-search apk, a simple adb command will let us install it on the Android Things device:
$ adb install base.apkAnd it works!!!!1!-ish…
On the first launch you will probably have to accept a UI dialog.
I repeat: “accept a UI dialog”… “on a nano-computer”… “with probably no screens, no input devices, nothing”.
(hint: simply temporarily connect a USB mouse to the Rapsberry Pi, or use Vysor. You only have to do this step once)
Another issue: when the voice search fails to recognize a text, a dialog will stays forever until you press back (and on Android Things, you have no back button of course, until you add a physical one).
Hey, I told you it was the “Quick & Dirty way”!
So, add a physical GPIO button to cancel the dialog (ugly). Better (well, it depends), decompile the voice-search apk, modify the smali code to automatically dismiss that part, and recompile the apk. (Please don’t do that, for legal reasons).
Below, a video of the voice search speech recognizer, in action, repeating everything I say, after pressing a button (source code here):
Pros:
- Fast integration (simply install the apk and you’re done). Great for prototyping
- Voice recognition works pretty well (if your English is good, of course)
- Once Android Things supports Speech-to-Text natively, you probably won’t have to modify your source code. Simply uninstall the unofficial voice-search apk, and you’re done
Cons:
- Pretty hacky, so far
- May require an external display (for the first launch / when a search fails)
- Can bring you to jail if you start decompiling the apk, or do other kind of crazy stuff
Solution #2: The “Quick & Cloudy” way
Another solution would be to use a Speech-To-Text online service, such as Google Cloud Speech API or Microsoft Bing Speech API.
Pros:
- Works really well
- Supports multiple languages
- Keeps your apk size small
Cons:
- Requires an Internet connection
- Pay per use, after exceeding the quota limit.
Solution #3: The “Open Source” way
Solutions 1 and 2 can be fine depending on your needs. However, I wanted an offline, non-hacky way to add speech recognition to my Android Things application.
So I went with solution 3, a.k.a. “Integrating an open source speech recognition toolkit (CMU Pocketsphinx) to my app”.
Luckily, Pocketsphinx already provides an Android sample. If you’re interested, take a look at the (easy to read) sample source code to understand their API.
In a nutshell, integrating Pocketsphinx in your Android (or Android Things) application consists in:
- Adding a native (x86/arm) library, bundled in an .aar file to your project
- Adding some files (the language model / dictionary of all the words the recognizer can understand) to your assets directory
- Creating an instance of a SpeechRecognizer.
The SpeechRecognizer requires some setup. You need to give it some context about what kind of words it should understand at a given moment.
For example, the first thing I want it to understand is the “Ok Things” sentence. Nothing else. So I set it up the following way:
recognizer.addKeyphraseSearch("OKTHINGS_CONTEXT", "ok things");Then, I tell it to start listening to words from the "OKTHINGS_CONTEXT":
recognizer.startListening("OKTHINGS_CONTEXT");From this moment, the recognizer will periodically call the onPartialResult callback. When the user stops talking, onEndOfSpeech callback will be triggered, this is where you can stop the recognizer. Stopping the recognizer will trigger an onResult method with the recognized sentence as a method parameter.
Once the recognizer has detected the “Ok Things” key phrase, it should switch context. It’s not about recognizing “Ok Things” stuff anymore, but instead recognizing orders, such as “Turn on the TV”, “Play some music”, “What time is it?” etc.
It is essential to provide a context. I found Sphinx to work pretty well when providing it a small set of predefined sentences/keywords.
On the contrary, text recognition was not as good, when using 133,000 words from the EN-US dictionnary.
To create your language model, first, create a list of sentences you expect it to recognize:
$ cat predefined.txt
<s> turn on the tv please </s>
<s> how is the weather </s>
<s> right now </s>
<s> what time is it </s>
<s> how are you today </s>
<s> play some music </s>
<s> tell me a joke </s>
Then, install cmuclmtk and sphinxbase packages, and convert this text file into a Sphinx language model binary, as explained in the official documentation:
$ text2wfreq < predefined.txt | wfreq2vocab > predefined.vocab
$ text2idngram -vocab predefined.vocab -idngram predefined.idngram < predefined.txt
$ idngram2lm -vocab_type 0 -idngram predefined.idngram -vocab predefined.vocab -arpa predefined.lm
$ sphinx_lm_convert -i predefined.lm -o predefined.lm.bin
This will generate a predefined.lm.bin file you can place in the assets/sync directory.
Then, you can configure pocketsphinx to use this language model, when at a given context (which I named "PREDEFINEDACTIONS_CONTEXT"):
File model = new File(assetsDir, "predefined.lm.bin");
recognizer.addNgramSearch("PREDEFINEDACTIONS_CONTEXT", model);
Now, each time the recognizer, in the "OKTHINGS_CONTEXT" has detected the “Ok Things” key phrase, you switch to the "PREDEFINEDACTIONS_CONTEXT" so it can recognize actions you are planning to say.
Switching context means “startListening” to a given context, with an optional timeout (here, 10 seconds)
recognizer.startListening("PREDEFINEDACTIONS_CONTEXT", 10_000);Note: if you don’t want to create your predefined actions context, you can configure Sphinx to detect every word from the dictionary by downloading a full en-us language model, and configuring the recognizer this way:
recognizer.addNgramSearch("EN-US_CONTEXT", new File(assetsDir, "en-us.lm.bin"));Yet, this is not something I would recommand. First because it will drastically increases your apk size, and then because the recognition would not be as good as with a given restricted language model.
I used pocketsphinx in the introduction video for this article.
Source code is available on GitHub.
Pros:
- Offline speech recognition
- Works well on a limited dictionary (predefined words / sentences)
Cons:
- Integration seems complicated at first
- Random sentences detection is not as good as the one from the two previous solutions
Conclusion
With Android Things Developer Preview 2, you can start adding Text-To-Speech and Speech-To-Text to your projects right now.
Text-To-Speech is so easy to integrate, it’s a nice feature you can add to your smart device projects at (almost) no additional cost.
It will probably take you a little longer to integrate voice recognition, but it’s worth the fun.
Source code, for the simple, stupid assistant is available on github.com/Nilhcem/audiofun-androidthings.